600-monster mode
Green 400. Blue 910. Purple 10,000 kills.
These totals use the gauge values shown for the 600-monster mode and assume every qualifying kill goes to the same monster and matching card target. The percentage is deterministic gauge progress, not the random chance that a card drops on that kill.
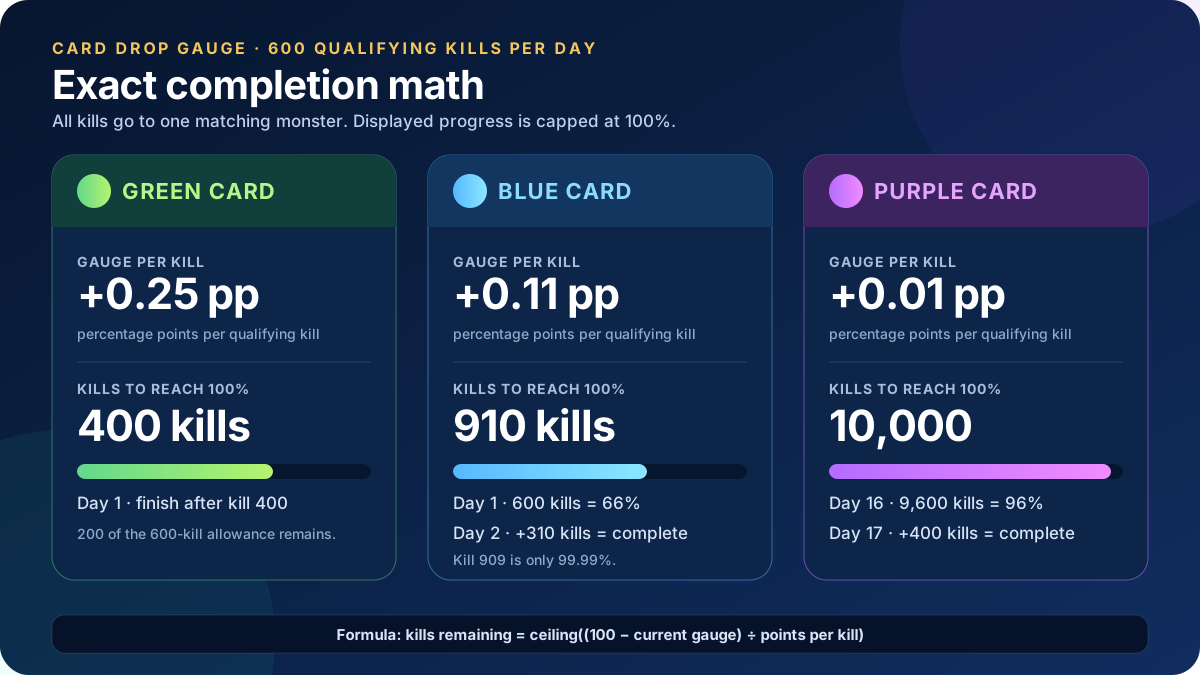
| Card color | Gauge per kill | Kills to 100% | After day 1 | Exact finish |
|---|---|---|---|---|
| Green | +0.25 pp | 400 | 100% after 400 kills | Day 1 · 400 kills |
| Blue | +0.11 pp | 910 | 66% after 600 kills | Day 2 · 310 more kills |
| Purple | +0.01 pp | 10,000 | 6% after 600 kills | Day 17 · 400 more kills |
Why blue takes 910 kills
100 ÷ 0.11 = 909.09. Kills are whole numbers, so round up. At kill 909 the gauge is 99.99%; kill 910 crosses 100%.
Do not count raw overflow
A full day calculates to 150% green, two full days to 132% blue, and 17 full days to 102% purple. For planning, cap each gauge at 100% and stop when it completes.
Daily progress tracker
The final day is only a partial 600-kill day.
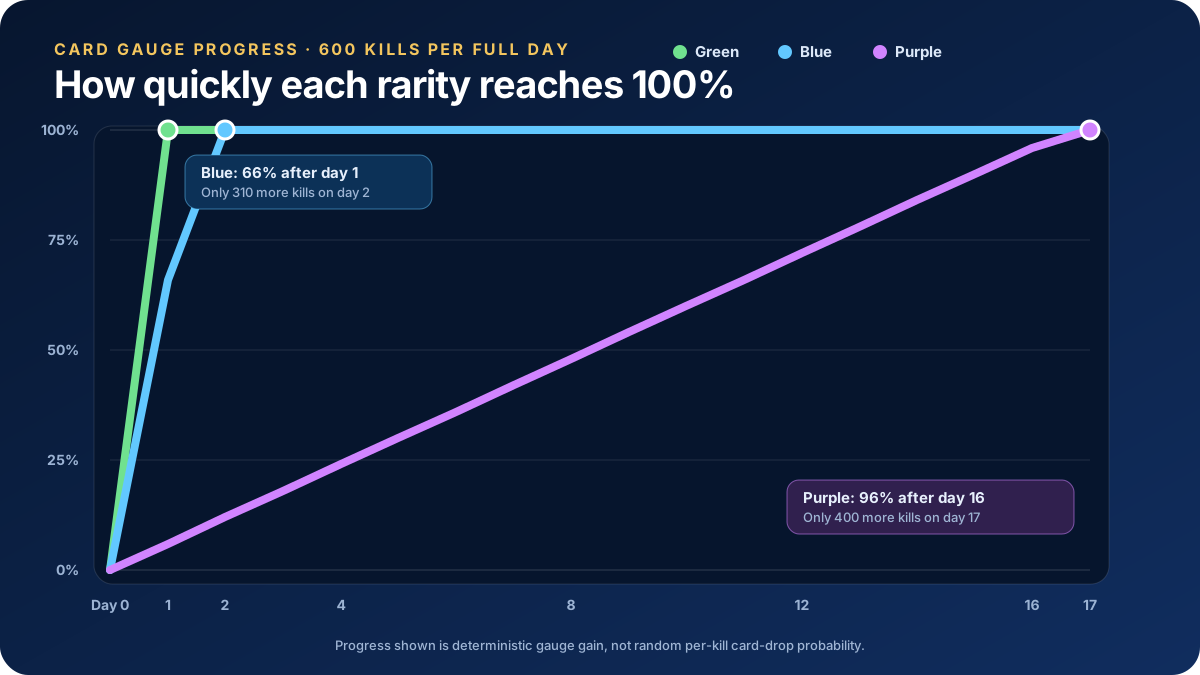
At the full daily allowance, green finishes during day 1. Blue needs one full day plus 310 kills. Purple needs 16 full days plus 400 kills. Splitting the 600 kills between different monsters slows each individual card gauge.
Use this for any current gauge
Kills remaining = ceiling((100 − current gauge %) ÷ gauge points per kill)
Days remaining = ceiling(kills remaining ÷ 600)
Card Index → Monster Index → World Map
A six-step farming workflow.
The strongest route begins with the build requirement rather than a famous card name. Follow the data from effect to source to monster to habitat, then confirm the route with real session results.

Define the missing effect
Start with the build problem: damage, HIT, CRIT, survivability, SP comfort, resistance, or a specific encounter mechanic. Searching by effect is more efficient than browsing only by rarity.
Review the build first
Shortlist cards in the Card Index
Filter by card slot, rarity, monster class, obtain source, name, or effect. Confirm that the card can actually be equipped in the slot available to the build.
Search the Card Index
Verify every obtain source
A card may come from normal monsters, Elite, Mini, MVP, activities, trade, tasks, dungeons, towers, shops, or other systems. Do not assume the monster source is the only practical route.
Compare obtain sources
Inspect the monster and drops
Check target level, type, element, race, size, habitat, linked cards, and other drops. A slightly weaker card can become the better progression choice when its monster is much easier to farm.
Open the Monster Index
Build a repeatable map route
Use the World Map to locate habitats and markers. Prefer routes with low travel time, reliable monster access, safe recovery, and useful secondary drops.
Plan on the World Map
Measure the session
Track kills, useful drops, materials, travel time, deaths, and consumable cost. Continue because the route performs well—not because a previous dry session feels like it must be repaid.
Use the session templateProgression order
Upgrade the account in stages.
These are not universal card rankings. They are an investment sequence: fill weak slots, solve current content, strengthen the build engine, and only then pursue the longest prestige targets.
Fill empty or mismatched slots
Use accessible cards that provide a relevant base stat, resistance, or quality-of-life effect. A functional slot is better than holding an empty slot while waiting for an ideal rare card.
 Cramp CardATK and M.ATK
 Poring CardLUK
Solve content-specific problems
Target cards that answer a repeated failure condition. Resistance and immunity effects can outperform a small damage gain when control effects are stopping the character from acting.
 Giearth CardConfusion immunity
 Marduk CardSilence immunity
 Nightmare CardSleep immunity
Strengthen the build engine
Move from generic stats toward multipliers and effects that match the build. Confirm the exact slot and full equipment package before committing to a long farm.
 Angra Mantis CardCRIT DMG
 Mistress CardMagic damage and SP efficiency
Pursue prestige and MVP targets
Gold and MVP cards can be transformative, but they should not block cheaper improvements across the rest of the loadout. Treat them as long projects with alternative sources checked first.
 Pharaoh CardPhysical and magic damage reduction
 Orc Hero CardVIT and stun immunity
Target evaluation
Score the route before committing to it.
Build fit
Does the card improve the character's actual damage type, role, resistance need, or current content objective?
Source access
Can the account reliably enter the map, activity, dungeon, tower, market, or boss schedule that supplies it?
Kill speed
How many relevant targets can be defeated per minute without excessive downtime or consumable use?
Route density
How much of the session is spent fighting useful targets rather than traveling, waiting, or recovering?
Secondary value
Do the same monsters provide useful materials, equipment, currency, experience, or additional card targets?
Replacement risk
Will the card remain useful after the next equipment, build, or content upgrade?
Prefer the target that improves the build and can be farmed consistently. A prestigious card with poor access, low uptime, or a likely near-term replacement can be a weaker account decision.
Obtain-source planning
Monster drops are only one source category.
The Card Index stores multiple acquisition tables. Compare all available sources before deciding that open-world farming is the correct method.
Normal, Elite, Mini and MVP monsters
Use the monster-class filters to compare farm difficulty. The source index can include level, type, handbook status, and an available rate value.
Activities and dungeons
The card dataset includes sources such as MVP activities, boss trophies, Heim dungeons, Forest activities, and Infinity Tower. Check schedule and entry limits before choosing these as the main route.
Trade, auction and shops
A direct purchase may be more efficient than farming when the route has poor uptime or the card is also obtainable through trade, auction, or store systems.
Tasks, sign-in and other sources
Some cards have non-monster acquisition paths. Always inspect the complete source list before committing days of combat farming.
Session templates
Test first, then scale the farm.
Route test
- Confirm the correct monster and habitat.
- Measure travel and respawn downtime.
- Check survival and consumable pressure.
- Decide whether the route deserves a full session.
Focused farm
- Record starting consumables and currency.
- Stay on one planned loop.
- Count useful cards, materials, and secondary drops.
- Compare the result with another source or target.
Only after validation
- Complete higher-priority limited daily content first.
- Set a time or consumable stop rule.
- Take breaks and reassess declining efficiency.
- Stop when the route no longer justifies the opportunity cost.
Avoid wasted sessions
Six common farming mistakes.
Farming by rarity alone
Rarity does not guarantee build fit, slot compatibility, source access, or good return on time.
Ignoring alternative sources
The Card Index can list trade, tasks, dungeons, towers, shops, sign-in, and other acquisition paths.
Choosing a monster you kill slowly
A lower-value target with higher kills per minute can produce better total progression and less consumable pressure.
Using unknown rates as precise odds
When no rate is shown, treat the probability as unknown. Do not invent a percentage or estimate expected completion time from missing data.
Farming one target with no stop rule
Set a session length or resource limit, then reassess the route instead of chasing a dry streak indefinitely.
Consuming cards before checking fusion
Review the Card Fusion tool and its official-versus-speculated information before using valuable cards as materials.
Connected research tools
Move from effect to route without guessing.
Card IndexSearch effects, slots, rarity, sources, monsters, rates, and fusion.Monster IndexInspect level, element, race, size, habitat, stats, and drops.World MapLocate monsters and build a low-travel farming loop. Equipment IndexConfirm the target slot and the equipment package receiving the card.
 MVP Hunting GuideCompare mapped bosses, counters, markers, and party preparation.
 Zeny Farming GuideMeasure completed income, costs, and comparable net Zeny per hour.
Frequently asked questions
Farming and card FAQ
How many monsters fill the green, blue, and purple card drop gauges?
From an empty gauge at the listed 600-monster-mode values, green needs 400 qualifying kills, blue needs 910, and purple needs 10,000. Blue requires 910 because 909 kills at 0.11 percentage points each produce only 99.99%.
How many days does each card color take at 600 monsters per day?
Green completes after 400 kills on day 1. Blue reaches 66% after 600 kills and needs 310 more on day 2. Purple reaches 96% after 16 full 600-kill days and needs 400 more kills on day 17.
Is card drop gauge progress the same as card drop chance?
No. The 0.25, 0.11, and 0.01 values in this guide are deterministic gauge percentage points gained per qualifying kill. They are not the random probability that the card drops on that kill.
Do I need to farm all 600 monsters on the final day?
No, if the listed per-kill values apply and the gauge starts at 0%. Green stops at 400 kills on day 1, blue needs only 310 kills on day 2, and purple needs only 400 kills on day 17. Extra arithmetic above 100% should not be treated as carryover unless the current game UI explicitly says so.
Should I always farm the highest-rarity card available?
No. Build fit, slot compatibility, source access, kill speed, and replacement risk matter more than rarity alone. An accessible card that immediately solves the build can be the stronger progression target.
What should I do when the Card Index does not show a drop rate?
Treat the rate as unknown. Use the source, monster, and map information to evaluate whether the route is practical, but do not convert missing data into a made-up percentage or expected number of kills.
How long should one card-farming session be?
Use a fixed block that fits the account: about 15 minutes for a route test, 45 minutes for a normal focused session, or a longer block only when the route remains efficient and does not displace higher-priority daily content.
Is buying a card worse than farming it?
Not necessarily. Compare the market or shop cost with the time, consumables, entry limits, and alternative rewards of farming. Purchasing can be efficient when the same time produces more value elsewhere.
When should I use Card Fusion?
Check Card Fusion after defining the target card and before consuming duplicates or valuable materials. Review the tool's official information separately from any clearly labeled speculative information.
Data and editorial policy
Use known data without inventing missing odds.
Card names, effects, slots, rarity values, obtain-source tables, monster classes, linked monsters, and available rates are taken from the RTNW Hub card and monster datasets. Route scoring, progression stages, and session templates are editorial recommendations. When a rate is absent, the guide treats it as unknown rather than estimating a percentage.